# Use the Nova Experience on cPanel Module in WHMCSThe Nova Experience on cPanel WHMCS module installs into modules/servers/nova/ and optionally adds a Nova landing page by copying nova.php and nova.tpl into the store. Selling Nova requires a Nova server, a product group, and products for the Free, Nova Start, Nova Build, Nova Grow, and Nova Scale plans, with reCAPTCHA or hCaptcha enabled. nova_config.json sets the required freeProductId and groupId keys, and the Nova Partner Dashboard's upgrade URL must point to the store's nova.php endpoint.
If you bill your customers through WHMCS, you can use the official Nova Experience on cPanel provisioning module. This module provisions each Nova account on your cPanel & WHM server when the customer orders it. After provisioning, it logs customers in to Nova directly, carrying the prompt they entered.
{{< callout context="note" icon="outline/info-circle" >}}
- This module requires that you use WHMCS 8.13 or later on a **self-hosted** WHMCS installation and that your cPanel & WHM server [meets the requirements for offering Nova](/en/partners/cpanel/offer-nova-experience-in-cpanel/).
- Before performing the steps below, make certain that you have set up Nova Experience in WHM. For more information, read our [Offer Nova Experience in cPanel](/en/partners/cpanel/offer-nova-experience-in-cpanel/) documentation.
- This module is separate from the WebPros Partner Module used to [offer Nova in WebPros Cloud](/en/partners/webpros-cloud/offer-nova-in-webpros-cloud/). Use this module only if you host Nova on your own cPanel & WHM server.
{{< /callout >}}
## Step 1: Install the Nova Experience on cPanel provisioning module
To install the Nova Experience on cPanel provisioning module, perform the following steps:
1. Download the module from the WHMCS Marketplace.
2. In your WHMCS installation, create the `/modules/servers/nova/` directory.
3. Upload the module files to the directory.
4. Rename the `modules/servers/nova_config.json.new` file to be the `nova_config.json` file.
## Step 2: Add the Nova Experience landing page to your store
This optional landing page adds a Nova prompt widget to your online store, allowing visitors to describe what they want to build before ever creating an account. Customers enter a prompt, complete the checkout process, and then return to Nova to build their website or web app.
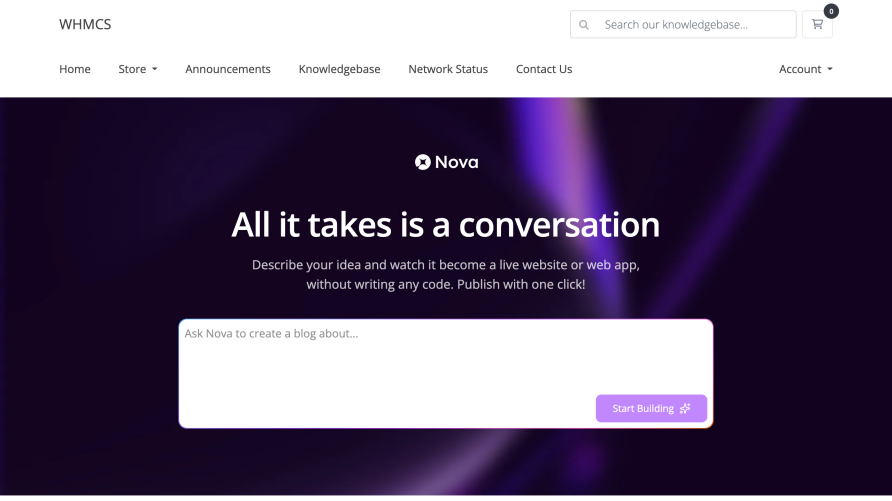 To add the Nova Experience on cPanel landing page to your store, perform the following steps:
1. Copy the `nova.php` file from the module files into the WHMCS root directory.
2. Copy the `templates/default/nova.tpl` file from the module files into the directory for your active Client Area theme (for example, `templates/twenty-one/nova.tpl`).
## Step 3: Set up Nova Experience sales in WHMCS
To start selling Nova Experience in your WHMCS online store, perform the following steps:
1. Add a Nova server to WHMCS using the _Nova Experience on cPanel_ module. For more information, read our Create a Server documentation.
2. Create a product group for Nova products. For more information, read our Create a Product Group documentation.
3. Create a product for each available Nova plan: Free, Nova Start, Nova Build, Nova Grow, and Nova Scale.
- When you create each product, make certain to:
- Select the _Nova Experience on cPanel_ module in the _Module Settings_ tab.
- Select all higher plans in the _Upgrades_ tab under _Upgrade Packages_.
{{< callout context="caution" icon="outline/alert-triangle" >}}
If you do not correctly list the plans for upgrades, clients will be unable to upgrade their Nova plans.
{{< /callout >}}
- Check _Featured_ in the _Details_ tab to indicate the plan that should display a _Most Popular_ badge.
- For the Free plan's product, check _Automatically setup the product as soon as the order is placed_.
- For more information, read our Create a Product documentation.
4. Enable Google® reCAPTCHA or hCaptcha® in the _Security_ tab at _Configuration >> System Settings >> General Settings_.
{{< callout context="caution" icon="outline/alert-triangle" >}}
_Default (6 Character Verification Code)_ is **not** compatible with the Nova Experience on cPanel module.
{{< /callout >}}
For more information, read our Enable reCAPTCHA v3 or Enable hCaptcha documentation.
## Step 4: Configure the nova_config.json file
Edit the `modules/servers/nova_config.json` file to set the following **required** keys:
| Key | Description |
| :-: | ----------- |
| `freeProductId` | The Free plan's product ID. You **must** replace the default value (`0`) with the product ID. |
| `groupId` | The Nova product group ID. You **must** replace the default value (`0`) with the product group ID. |
| `applicationName` | The brand name to use, if you want to white-label Nova in your store. Retain the default value to display `Nova` as the name. |
| `recognizeUpgradeLinks` | Whether to detect the user's identity when they arrive on the Nova landing page after clicking an upgrade link. |
| `registrationFields` | A list of customer information fields to require during checkout. Set each field to `true` to require it or `false` to make the field optional. |
For example:
```json
{
"_comment": "Nova Configuration, read by both the landing page and the server module. See README.txt for details.",
"applicationName": "Nova",
"freeProductId": 17,
"groupId": 5,
"recognizeUpgradeLinks": true,
"registrationFields": {
"firstname": true,
"lastname": true,
"companyname": false,
"address1": false,
"city": false,
"state": false,
"postcode": false,
"country": true,
"phonenumber": false
}
}
```
## Step 5: Set your upgrade URL in the Nova Partner Dashboard
Log in to the Nova Partner Dashboard and set the _Upgrade URL_ to the following URL, where `example.com` is your WHMCS installation's system URL:
`https://example.com/nova.php?action=upgrade&username={username}`
## Step 6: Test your Nova setup
Before you begin advertising Nova to your customers, we recommend that you test purchasing Nova using the Nova landing page and verify that upgrade links are working properly.
To add the Nova Experience on cPanel landing page to your store, perform the following steps:
1. Copy the `nova.php` file from the module files into the WHMCS root directory.
2. Copy the `templates/default/nova.tpl` file from the module files into the directory for your active Client Area theme (for example, `templates/twenty-one/nova.tpl`).
## Step 3: Set up Nova Experience sales in WHMCS
To start selling Nova Experience in your WHMCS online store, perform the following steps:
1. Add a Nova server to WHMCS using the _Nova Experience on cPanel_ module. For more information, read our Create a Server documentation.
2. Create a product group for Nova products. For more information, read our Create a Product Group documentation.
3. Create a product for each available Nova plan: Free, Nova Start, Nova Build, Nova Grow, and Nova Scale.
- When you create each product, make certain to:
- Select the _Nova Experience on cPanel_ module in the _Module Settings_ tab.
- Select all higher plans in the _Upgrades_ tab under _Upgrade Packages_.
{{< callout context="caution" icon="outline/alert-triangle" >}}
If you do not correctly list the plans for upgrades, clients will be unable to upgrade their Nova plans.
{{< /callout >}}
- Check _Featured_ in the _Details_ tab to indicate the plan that should display a _Most Popular_ badge.
- For the Free plan's product, check _Automatically setup the product as soon as the order is placed_.
- For more information, read our Create a Product documentation.
4. Enable Google® reCAPTCHA or hCaptcha® in the _Security_ tab at _Configuration >> System Settings >> General Settings_.
{{< callout context="caution" icon="outline/alert-triangle" >}}
_Default (6 Character Verification Code)_ is **not** compatible with the Nova Experience on cPanel module.
{{< /callout >}}
For more information, read our Enable reCAPTCHA v3 or Enable hCaptcha documentation.
## Step 4: Configure the nova_config.json file
Edit the `modules/servers/nova_config.json` file to set the following **required** keys:
| Key | Description |
| :-: | ----------- |
| `freeProductId` | The Free plan's product ID. You **must** replace the default value (`0`) with the product ID. |
| `groupId` | The Nova product group ID. You **must** replace the default value (`0`) with the product group ID. |
| `applicationName` | The brand name to use, if you want to white-label Nova in your store. Retain the default value to display `Nova` as the name. |
| `recognizeUpgradeLinks` | Whether to detect the user's identity when they arrive on the Nova landing page after clicking an upgrade link. |
| `registrationFields` | A list of customer information fields to require during checkout. Set each field to `true` to require it or `false` to make the field optional. |
For example:
```json
{
"_comment": "Nova Configuration, read by both the landing page and the server module. See README.txt for details.",
"applicationName": "Nova",
"freeProductId": 17,
"groupId": 5,
"recognizeUpgradeLinks": true,
"registrationFields": {
"firstname": true,
"lastname": true,
"companyname": false,
"address1": false,
"city": false,
"state": false,
"postcode": false,
"country": true,
"phonenumber": false
}
}
```
## Step 5: Set your upgrade URL in the Nova Partner Dashboard
Log in to the Nova Partner Dashboard and set the _Upgrade URL_ to the following URL, where `example.com` is your WHMCS installation's system URL:
`https://example.com/nova.php?action=upgrade&username={username}`
## Step 6: Test your Nova setup
Before you begin advertising Nova to your customers, we recommend that you test purchasing Nova using the Nova landing page and verify that upgrade links are working properly.